Monday, October 30, 2006

More Rear Logic Work

Tonight I started work on getting the rear logics mounted. First, I drilled the perf board so that I could mount the PIC flasher circuit to it, using nylon screws, nuts and standoffs.


Next, I cut a couple of pieces of flat metal bar, drilled a hole in one end of each of them to screw them down to the dome ring, and bent them so that they will rest flat on the dome ring. I will screw the perf board onto the bars.

I still need to bend and cut the bars down a bit more, and drill the perf board such that the LEDs will be centered in the dome hole for the rear logics, when mounted to the bars.

Sunday, October 29, 2006

Recut PVC Foot Strips

Mike and I gave it another go today, recutting the strips of PVC that go around the bottom of the foot. The PVC sawdust gets everywhere. Note the adorable bunny suit Mike is wearing to keep clean.


Thirty-six more strips were cut (plus twelve backing strips, plus a few extras). The blueprints show different angles for the outer feet (12 degrees) vs. the center foot (18 degrees). We decided to go with what Mike did on his first droid, and cut all the strips at 12 degrees.


Later on, Matthew Henricks dropped by to talk frames with Mike.


Finally, apropos of nothing, the Goodyear Blimp Spirit of America buzzed me on the way home, so I took its picture. In fact, it's still flying around here, perhaps making practice landings at the nearby Tustin Marine Corps Air Station.

Saturday, October 28, 2006

Finished Wiring Rear Logic LEDs

Tonight I wired up the bottom row of LEDs, criss-crossing in a semi-random pattern to the top row.


All the lights blink the way I want. Recall that I will overlay a transparency with simulated color LEDs over these 16 lights, as a temporary solution for the rear logics while I await a real run of them.


I still need to build a mounting harness for the board, and get it installed and wired up in the dome.

Friday, October 27, 2006

Half of the Rear Logic LEDs Wired

More soldering tonight, as I managed to wire up the top row of 8 LEDs.


Looks like the crude soldering job was good enough to work. I'll start criss-crossing some of the LEDs' cathodes to finish the bottom row tomorrow.

Thursday, October 26, 2006

Started Rear Logic LEDs

I decided to go ahead and start wiring up my rear logic LEDs using the superbrights that I already have. If need be, I can dim them somehow later.

First, I had to spend more time than I anticipated, organizing the LED pattern so that the 16 LEDs on only 8 wires would appear to blink as randomly as possible. Since two LEDs will share each wire, a regular wiring pattern wouldn't look so good. Once I had the pattern set, I started placing the top row of 8 LEDs. The LED leads needed to be trimmed down, they were way too long.


The PIC flasher circuit has a common connection for all the anodes. Being the lazy bum that I am, I just stitched the anodes together by soldering the left-over sections of the trimmed LED legs. I tested each individual LED after I was done with the whole row, and they each blinked properly. So even though the solder job is ugly, it works.


To be continued...

Wednesday, October 25, 2006

Tested Rear Logic Wiring, Aluminum 2x4 Arrives

I had planned to finish wiring up the rear logics tonight, but all I have are superbright LEDs, and they are super bright! They may be too bright without something to dim them (e.g. some marker on the LED, or film in front of it). I think I'll try to find some LEDs of lower intensity. In the meantime, I was able to verify that last night's wiring job works.

Some aluminum 2x4 (0.25" thick wall) that I ordered from McMaster-Carr arrived today. Together with the tubing I bought from Joe, I should have the raw materials for a basic drivetrain structure.


I forgot to mention that I ordered the CFSound III sound board and Sense 24 input switch for R2's audio system yesterday. It's on back order, should ship the first week in November.

Tuesday, October 24, 2006

Started Working on Temporary Rear Logics

Way back in September 2005, I put together one of the PIC flasher kits I ordered from Carl's Electronics. Well, until there is a run of rear logics, I've found a use for it.

Copying Mike as usual, I'm going to use 16 LEDs to light the rear logics, with a fake set of LEDs printed on a transparency, rather than attempt to solder up 108 actual LEDs. The transparency will be lit from the back by the 16 LEDs that will be blinking and cycling via the PIC flasher circuit.

The first order of business was digging up the old board, which still had the LEDs from the kit sloppily soldered together.


Next, it was time to start pulling off those LEDs.


Finally, I pulled off nine strands of some ribbon cable for an IDE drive and soldered the ends to the PIC flasher board, one by one.


Tomorrow I hope to start working on the other end of the cable. I'll cut some project board to hold the LEDs, and then solder them up.

Sunday, October 22, 2006

Measure Once, Cut 48, and Start All Over

"This would be a pretty misleading weblog if I just showed the stuff that went right..." (Entry from December 10, 2005.)

Mike had some unexpected free time today, so we decided to try cutting the small strips that make up the bottom of the foot shells. Unfortunately, we misinterpreted the blueprints. Instead of cutting a bunch of strips of PVC at an 18 degree angle, we cut them all at a 36 degree angle.


Only after we were done cutting up a few sheets of PVC, and a few hours on the table saw, did we realize the error.

Oh well, these things happen.

We hope to try again next weekend. Looking at the bright side, it was good practice, and we got a usable jig out of it. In the meantime, there are a lot of PVC sticks offering a vertical support structure to trash in the trash can.

Saturday, October 21, 2006

More Center Foot Shell Cutting

After a week away from the center foot shells, I was able to pay a visit at Mike's, where he had a 12" blade on his compound miter saw that was able to finish the remaining cuts.

As each cut came up, the miter saw was tilted and angled to the required setting. This was a somewhat iterative process, and it helped a lot that we could refer to Mike's finished center foot shell.


I did one cut, but Mike did the other two dozen or so.


In fact, we decided it made sense for Mike to cut an extra set for himself. Some of the cuts were made on the table saw, some on the miter saw.


The end result was just what we hoped for. We still need to cut the strips toward the bottom of the four sides of the foot shells, and we need to cut the left and right sides to put a groove in place, and allow access to the inside of the shell. Hopefully this will continue next weekend.

Thursday, October 19, 2006

Painted Utility Arm Backstops

Once again, getting the bare minimum done.

I painted the utility arm backstops flat-black today. Not sure if I'm going to glue these down immediately, or wait until I'm confident the arms and their pivot points won't change. I'll probably wait a bit.

Wednesday, October 18, 2006

Started Working on Utility Arm Backstops

Tonight I cut a couple of pieces of 1/4" MDF, to serve as backstops for the utility arms in the frame. Something's got to keep the arms from turning right into the body, so these should do the trick.

I will paint them black before I glue them down permanently.

Tuesday, October 17, 2006

Aluminum Tubing Arrives

Joe's aluminum tubing arrived today. I hope to construct the internal structure of the feet from this, along with Darryl's channel that I ordered previously.

Monday, October 16, 2006

Glued in Horseshoe Screws

Months after the fact, I finally glued in the screws that hold the horseshoes onto the legs. I waited to see if I needed to cut the screws down, but testing tonight showed they should be fine.

A nut on each screw secures the whole thing to the leg. The tops of the booster covers work the same way. Super glue holds the screws in the horseshoes. (Gotta love a product named "Zap-O.")


This is the stuff I do when I feel the need to fill space here. Thrilling, eh?

Sunday, October 15, 2006

Glued Down Pocket Vents

Today I used silicone to affix the pocket vents to the frame and skins. Blue tape holds the pocket vents in place while the silicone dries.


Once the side vents arrive next month, all of the holes in the body will be done!

Saturday, October 14, 2006

Started Cutting Center Foot Shell, Alu Octagon Ports Arrive

I finally started work on my PVC center foot shell today.

I began with the beveled cuts for the top and bottom edge of each of the four sides.


Next, I cut the very top piece of the foot shell, which also has beveled edges. This piece will be further cut later, when a 1" wide channel is made for the ankle tip to connect to the foot.


I came to a grinding halt when it was time to cut the angles of the sides, as I discovered that the blade on the miter saw I'm using is not large enough to cut across the required distance. I will see about begging to use another miter saw.

In the meantime, I labeled each piece, and put the work on hold. (One of the pieces I cut was large enough to cut two pieces from it, once I have access to an adequate miter saw.) Hopefully I can resume work on these shortly.


Last but not least, the incredibly good looking aluminum octagon ports from Michael McMaster arrived today. Right now, my frame cannot accommodate these without more cutting. If/when I need to take the skins off again, I will see about cutting the frame to fit these great parts. For now, I'm not letting them go(!). :)

.

Friday, October 13, 2006

Secured Pocket Vent Back Plates

Tonight I determined the paint on the back plates for the pocket vents had dried sufficiently to screw them down.

Eight screws hold the back plates to the pocket vents. I still need to permanently affix these to the body, most likely with silicone.


Wednesday, October 11, 2006

PVC Arrived

My foot shell PVC arrived today from McMaster-Carr (part #8747K146). Four sheets of 24"x24"x1/8" gray PVC. I intentionally ordered way more than I need, for any future endeavors.

Monday, October 09, 2006

Foil Tape for Pocket Vents

Tonight I cut some 3.5" x 11/16" strips of foil tape to hide the machining markings at the back of the pocket vents. It took me a few tries to get the strips of tape the right size, and with as few wrinkles as possible. Again, I could have used a kindergartner's help cutting along the lines. I lightly sanded the foil tape with 400 grit sandpaper, to better match the look of the aluminum vents.


Although I wasn't able to get the tape to lay down 100% wrinkle-free, I prefer this look over the machine marks that were visible in yesterday's photo. (I wonder if I could have safely sanded those marks out, without marring other surfaces? Oh well, it's moot now.)


Sunday, October 08, 2006

Pocket Vent Work

I know, I know. I'm supposed to be working on the PVC center foot shell. But I don't feel like I'm ready yet, I need to really understand how all the angles meet up and why. The visit to Mike's on Thursday was a big help, but I need to work through all this myself and understand why things connect the way they do. That, plus I didn't realize I have hardly any PVC left, I need to order more in order to finish the foot shells. D'oh!

So in the meantime, I worked on fitting the pocket vents into the body. I had hoped that I had Dremeled out enough material on the frame back on August 29 to fit the pocket vents within the body, but when the time came, that turned out not to be the case. Time to break out the Dremel again, and make more space.


Much better. As usual, I gave them a loose fit. I plan to secure them with silicone later. For now, I have the back plate taped on. I will screw it down at the end of the week when the paint has had plenty of time to completely dry. The back plate actually bends along the pocket vent curve, and I don't want to mess with the paint job by bending the plate until I think it's ready.


Mike recommended foil tape to cover the machining marks in the pocket, so I'll probably work on that tomorrow.

Saturday, October 07, 2006

Painted Pocket Vent Back Plates

I had big plans to start cutting the center foot shell today. That was before I went to bed at 4:00am this morning, and spent a good part of the day uploading pictures and documenting my experience from last night's event.

I did manage to paint the backing plates for the pocket vents, so at least I got something done. I hope to start on the foot shells tomorrow.

Rubbing Elbows

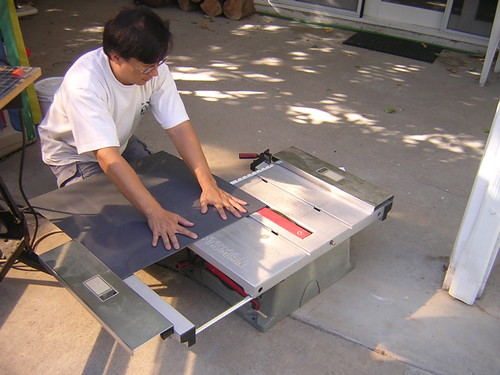
Once again, this isn't exactly R2 building, but it relates to it.

I had an interesting night last night.

I'll try to keep a reaallly long story short(er). Mike Senna was asked to have his R2 appear on stage last night, at the Shrine Auditorium for the Jules Verne Adventures Awards. I was lucky enough to have Mike invite me along. They were honoring George Lucas, Harrison Ford and Jane Goodall. That meant being backstage at the curtain for R2's appearance.

But first things first. Here's a rough timeline of the evening:

3:00pm-3:30pm: Mike arrived for rehearsals with stand-ins
5:00pm: I arrived
7:00pm: Red carpet arrivals
8:00pm: Scheduled start of show
10:00pm: Scheduled end of show, start of VIP party

The folks at the box office weren't all that helpful when I got there ("we don't have your name here"), so I called Mike and Amy and they got me in.

Mike asked if I wanted to be in the audience during the show, or backstage with him, where R2 would be waiting to go on, along with the honorees and celebrities. Ummm... backstage, please.

Mike had a magical yellow backstage pass, but I sure didn't. Still, Mike lead the way backstage (and on the stage itself since it was still early), to where R2 was. Later, we were able to secure extra backstage passes, and I was relieved that I wouldn't get the boot. Just that was cool enough, but it gets better.

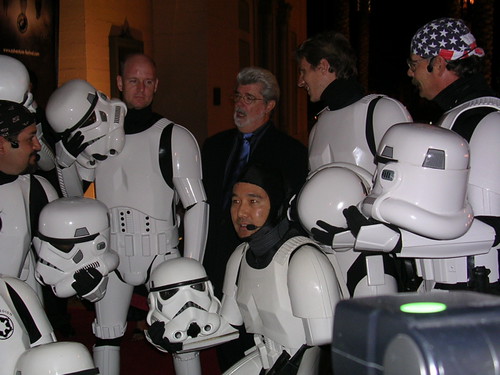
When we went back outside around 7:00pm, celebrities started arriving on the red carpet, including: Malcolm McDowell (MC of the show), Ray Harryhausen (who made the original black-and-white King Kong, and many other famous movies), Walter Koenig (Chekhov from the original Star Trek), James Cameron (director of Titanic and other blockbusters), Jane Goodall (lifetime of research of chimpanzees), Harrison Ford with Calista Flockhart, and ... George Lucas. There were a bunch of other celebrities that I did not recognize, some from the more contemporary Star Trek TV shows. About a dozen members of the local 501st were there, and got pictures with George.


After the red carpet, we went to the green room and dressing room areas, where Mike met up with Malcolm McDowell to go over their routine for the show: After Harrison Ford received his award, R2 was to interrupt Malcolm on stage, bump into him lightly, they'd exchange "words," and then R2 would continue driving off stage (stage right, we were stationed behind the curtain at stage left). More on that in a moment (I'll tell you now it went fine, no horror stories to tell).

The show started somewhat late. We took up our position back stage (along with a few of the 501st crew), right behind the curtain. It was very dark, and there was a wall of sound equipment next to us, with fans that pretty much drowned out anything being said on stage.

The first to go on was Ray Harryhausen. The "unveiling of Kong scene" in Harryhausen's King Kong was filmed in the very auditorium we were standing. As a special surprise, with Ray on stage, they revealed a prop I was told is now owned by a private collector: The original skeletal armature of the miniature King Kong model. I don't know how often Mr. Harryhausen gets to see it, but it was a special moment. Later, Mike got a picture of himself, Ray and the prop.

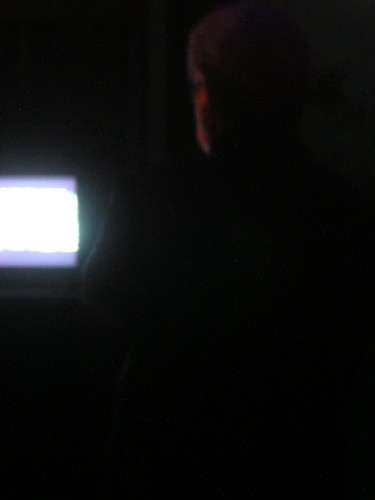
Next to go on stage was George. Before each person went on, they played a 5 minute clip highlighting career work. So George was standing not five feet in front of me backstage, watching an HDTV with a few of us behind the curtain that let us see what the audience was seeing projected on the main screen. We could actually take pictures back there, provided there was NO flash photography. That meant I got virtually NO good pictures back there. Still, it was worth it.

You'll have to take my word for it, that's George (from the back) to the right of the TV.


George went on, spoke for a few minutes (what he said, we couldn't hear), and then invited James Cameron to come up from the audience to join him. James said a few words, and they exited stage right.

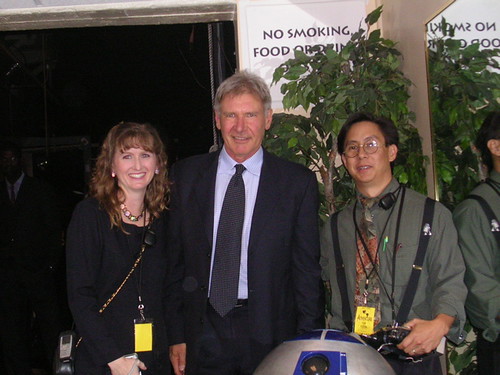
Next up, Harrison Ford. Harrison took up his position backstage, watched the TV as they showed his clip, and then went out and gave his talk. Mike's turn was coming up.

As Harrison was wrapping up, Mike started powering up the dome and test driving a couple of inches to make sure all systems were "go." They were.


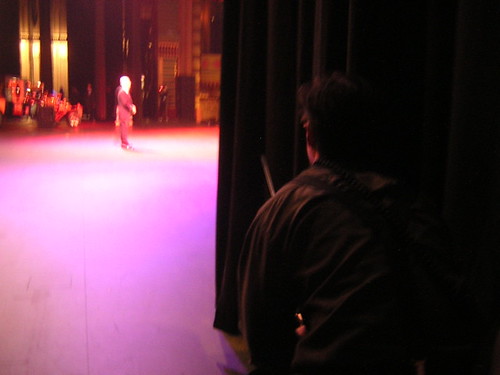
Mike drove R2 out from behind the curtain perfectly. R2 interrupted Malcolm with his beeps and boops, and on cue, nudged Malcolm. Malcolm ad-libbed something funny that we couldn't hear, and R2 drove off stage right. Perfect. We were done, we were psyched.

At this point we could walk around the back of the stage, which had a curtain in back that we could walk behind, and go back to the green room and dressing room areas. Mike went to retrieve R2 on the other side of the stage, while I made a few trips back and forth behind the curtain to gather the dolly and a few boxes Mike had brought.

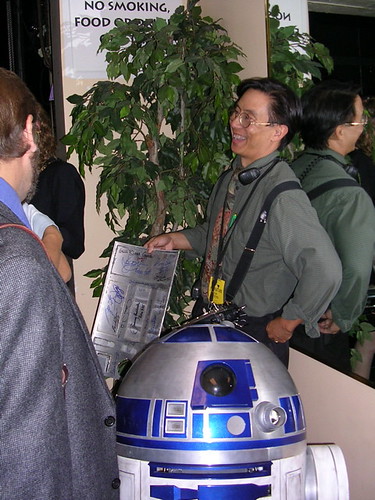
Once at the green room, we hung out just outside the door, hoping for the best. Pictures? Autographs? Who knows. As the opportunity arose, pictures were taken.


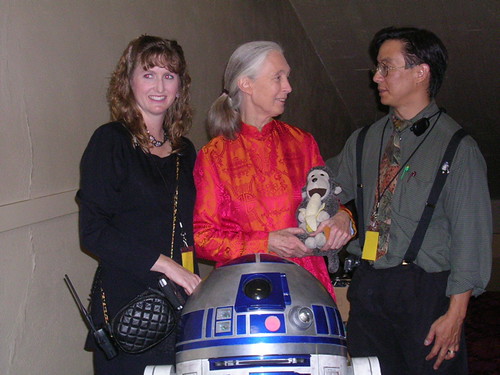
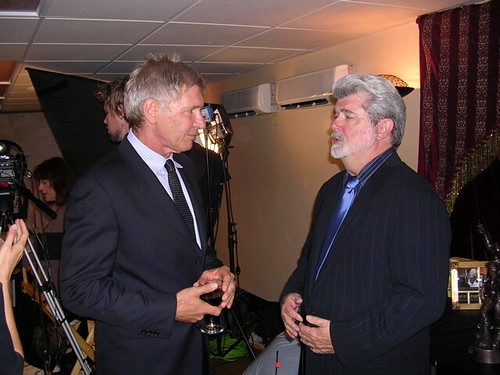
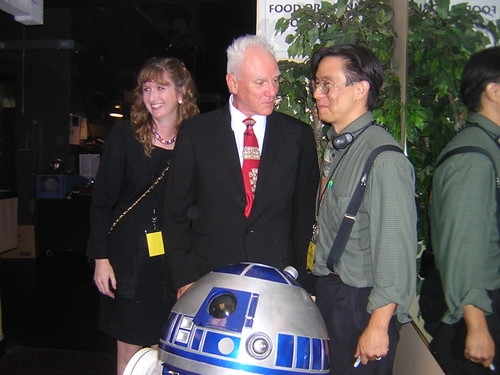
Mike had been dying to get Harrison to sign R2's back door, where almost all the main actors from the original trilogy (and many from the new trilogy) had signed. When Harrison came out of the green room, Mike asked for a quick picture with him, Amy and R2, followed by the signature on the panel. He got both!


After the show was over, Mike and Amy were supposed to be invited to the VIP party. No such guarantees for the rest of us. But, we all went up and crossed our fingers. When we got there, we were met by burly security guards, who informed us we were not on "the list." Mike and Amy were assured by the folks running the show they'd be in. They got stabbed in the back.

When the folks in charge were finally contacted, they first said no one gets in. Later they said only Mike could go in with R2, but not Amy. Mike said if Amy doesn't go in, R2 doesn't go in. They didn't go in.

Much later, they finally let Mike and Amy in with R2. Mike and I were in occasional radio contact, and I was chatting with the guards (I wasn't mad at them, they were doing their job).

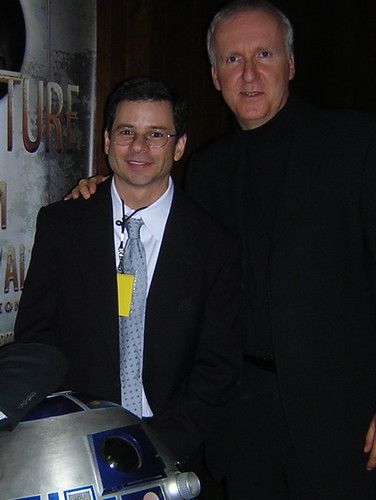
Well, much, much later, after almost everyone had left, they finally let a few more of us in. So I finally managed to get a picture with the only person remaining that I recognized, James Cameron.


By the time we left, it was 2:00am. After an hour drive home, I had to post at least one picture to the board, so I hit the hay close to 4:00am. It was a long day, but one that will be unforgettable. Thanks, Mike, for the opportunity I would never have had otherwise. I'm looking forward to Celebration 4!