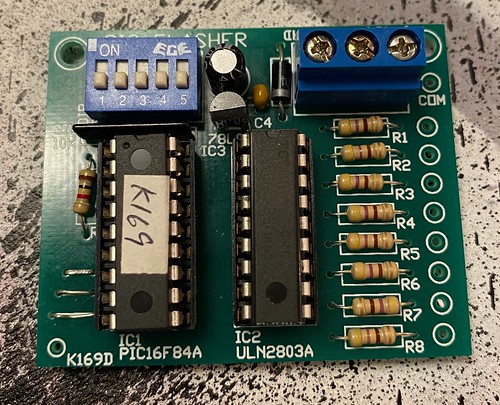
I've come to the conclusion that without running power from the main batteries to the dome, the JEDI rear logics that I have in droid #2 won't be able to run on the meager six D-cell batteries that I have powering all the dome electronics. As beautiful as they are, the rear logics, power distribution board and controller board for these draw about 1 amp, which is asking too much of the D-cells. Thus, I will be replacing the rear logics with the same setup I have in droid #1, namely the PIC flasher kit that powers 16 LEDs and uses a transparency with the 108-LED pattern to cheat the full effect.
I purchased a spare kit, just because.
One of the first things I noticed is that the PIC chip has 18 pins (9 on each side), and the SIL sockets only have 16 pins. Not awesome.
Luckily I happened to have a couple of spare 18-pin DIP sockets, so I sawed one in half and cut the lugs connecting the two sides, so I was able to proceed.
The socket holding the PIC chip needs to be cut in half because a couple of capacitors and the 20MHz oscillator live underneath it.
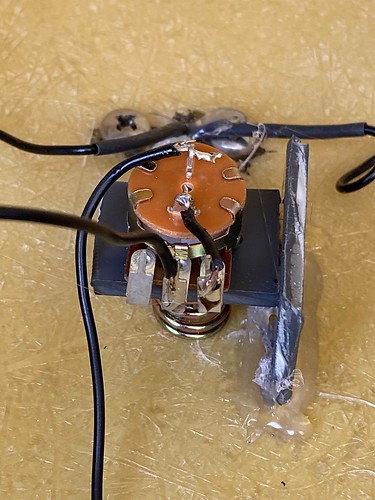
Before long, I had the whole thing soldered up.
This is going to get put together in slow motion since I have a few other things going on, but it'll get done eventually.
Last night, R2's left foot shell took some damage, so I did a quick repair today.
A little Oatey PVC glue is all I need to reattach the top of the foot shell door frame.
I debated about whether to cut a new pivot stick that got bent last night when it got fed into the drivetrain, but in the end laziness won out again, and I bent it back straight (more or less) and reattached it into the door.
Good enough for me, for now at least. Droid #2 has aluminum foot shells, and I think I need to seriously consider replacing the PVC foot shells with aluminum ones on droid #1 as well. It should be pretty evident this is not the first repair I've had to make over the last 16 years.
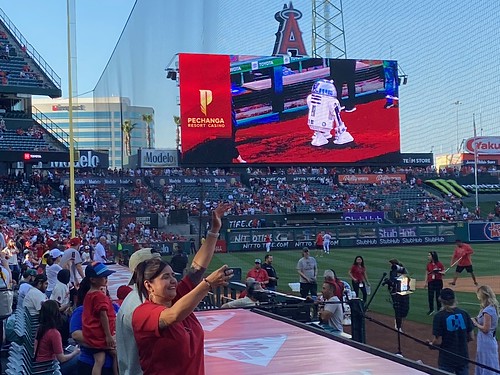
Tonight was Star Wars Night at Angel Stadium in Anaheim, CA, and I brought R2 out to join other Star Wars characters to entertain the fans.
I arrived around 3:20pm and unloaded onto my cart (with the Big A in the background), and then covered R2 up for the journey to our green room. I realize the BBQ smoker cover doesn't exactly conceal what's underneath, but it does help cut down on unscheduled stops for pictures.
Brian Dodds also brought his R2, and the Angels did a good job of giving us each activities that were in separate parts of the stadium, so it worked out pretty well.
First up for me was the rose garden area, where my friend/acquaintance from the Anaheim Ducks and CHOC, JoJo, was hosting as the DJ. It was nice seeing him again. Lots of people milled around and lined up for pictures with the characters.
As game time approached, they had me hide my droid on the field level concourse, as Brian's droid made its way around the warning track during the t-shirt launch phase of the pregame activites. That's Brian's droid in the big screen.
I got a little closer to the field to get better pictures. I think Brian and I took these two pictures at just about the exact same second. (I'm the dork in the second picture, just above the guy in the foreground with the hat on.)
Once the characters had cleared the field, they had my droid take its position directly behind home plate on the field level concourse.
At that point they had a couple of kids announce, "Play ball!" Then they immediately cut to my R2, and they dubbed in his beeps and I moved him around as he also said "Play ball!" as only he can.
The "play ball" kids came over and got a picture with R2, and then we headed to our next stop, which was way upstairs to do more photos with fans.
Our last scheduled activity for the evening was the 7th inning stretch. We made our way around the stadium to the tunnel near the right field foul pole and got a group photo of the characters that were present for that activity, before going out onto the warning track.
Once the middle of the 7th inning arrived, they opened the gates and we made our way onto the warning track near the right field foul pole. I left R2 close to the gate so I would be able to make a quick egress when it was time to wrap up out there.
So... just as I got R2 off the field, one of the characters inadvertently kicked R2's left foot shell very hard (I'm sure the character didn't see him), and the PVC foot shell broke. Worse, the left drive train was no longer turning.
I collected the top of the foot shell frame that cracked off and the side door, and pulled the left side of R2 up by his shoulder and had him limp out of view. I wasn't sure why the left drivetrain was disabled, but luckily one of the Angels staffers (Jeff) quickly found a cart, so we loaded R2 up on it and carted him back to the green room.
Once back in the green room, I discover the culprit. The right pivot stick of PVC that helps keep the door in place had been knocked off the inside of the left foot shell door, and got fed into the chain and then into one of the gears, jamming it up. A little unlucky, but at least it happened at the end of our appearance, and in the end, it wasn't a big deal.
The Angels won 2-0 over the Kansas City Royals, in an astonishing 2 hours 4 minutes, by far the quickest game I've ever been to. This improves R2's record with the Angels to 2-5. Hopefully we can return next year and continue working our way up to .500.
In The Mandalorian season 3, R5's "bad motivator" panel at the rear of the top of the dome shows grease and oil leaks, no doubt owing to the mishap from which he suffers in A New Hope. I decided to try to duplicate that look.
It's hard to get a good picture of the screen, but here's what it looks like in season 3, episode 2.
I used the same mix of paints and water that I used the other day for the neck ring panels.
I applied the mixture with a spoon, to try to pour on the same pattern seen in the show. It's not a 100% match, but it's reasonably close.
I think I'm done messing around with R5's dome, for now at least.
Poor R5's dome antenna looks like it's been patched back together with electrical tape on The Mandalorian season 3, so I decided to do the same with mine.
I don't want to put the electrical tape directly on the aluminum antenna, since it is so gummy. Instead, I'll lay down a layer of blue painters tape underneath.
Today I wrapped up work on weathering the new neck ring panels for R5. It was the same process as yesterday so I won't repeat that here, but here is the final result.
I went relatively light on the weathering, I mainly wanted it not to look too clean.
Looks good enough to me, but luckily my standards are low.
Having painted the neck ring panels for R5 silver, they looked a little too clean for my droid, so I decided to add a little weathering to them. I used mostly Carbon Black, with a little bit of Burnt Umber in the mix.
I added a little water and a drop of dish washing liquid and mixed it around.
I then applied a light coat of the soup to the panels.
Today I finished painting the 3D-printed segments that are backed by card stock for the R5 dome's neck ring.
Earlier I had applied a gray base coat. Today I wanted to apply a light top coat of aluminum.
I am going for a semi-weathered/industrial look, so I didn't want to completely obscure all the gray.
Once the paint had dried to the touch, I did a test-fit into one of the 16 neck ring slots to see how it looked. These segments will be friction-fit into place, and they will be removable.
Looks good enough to me. Soon I'll install all of them to see how the whole dome ring looks, but I think I'm done with the painting portion.
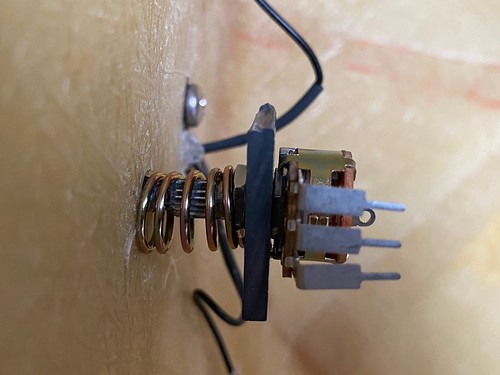
Today I was able to wrap up work on installing the On/Off/Dimmer switch for the LEDs in the R5 dome.
I will use a spring to apply tension to the greeblie/knob on the outside of the dome that will screw onto the screw that I attached to the potentiometer yesterday. Without the spring, the knob would be able to be pulled out from the outside of the dome.
I should be able to find a suitable one in my box-o-springs.
I found one that will do, and test-fit it in the dome.
I cut a small segment of flat PVC and hot-glued it in the dome, locating it against the PVC into which the potentiometer is mounted. This way, when I turn the knob on the outside of the dome, the potentiometer won't rotate with it.
I then desoldered the simple on/off slider switch I had been temporarily using, and wired up the potentiometer. The outside legs act as inputs, and the center leg is the output. I chose the right leg because it's the leg that starts with near-zero resistance when the potentiometer is clicked on.