Saturday, May 05, 2012

R2LA Build Day - May 2012

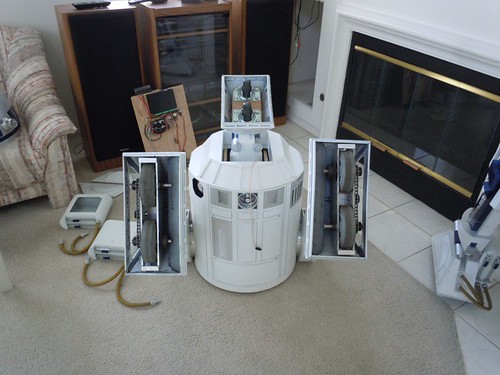
Droid #2 was head over heels for today's R2LA Build Day.


Mike Senna hosted a build day at his house, and I had two things I wanted to work on.

First, I needed to route out some material in the base of the new R5-D4 dome I recently ordered and received.  Second, I wanted to work on finishing up the drivetrains for droid #2 (hence the reason he was upside down; I needed to remove the feet and partially finished drivetrains to attach the motor mounts).  The R5 dome's base needs routing to allow clearance for the Rockler bearing, upon which it will spin.

At least 20 builders and a few droids were in attendance.  Marc Verdiell demonstrated his impressive droid, including the 2-3-2 transition.


In the meantime, my first order of business was to work on the R5 dome. Since none of us were sure if the base of the R5 dome was hollow, or what even it was made of, I took a "core sample" with a thin drill bit.

We're still not sure exactly what the base ring is made from, but it was solid, and possibly a resin or epoxy material. The key fact it is that it is flat, wide, and needs to be trimmed down so the Rockler bearing can fit inside the dome.
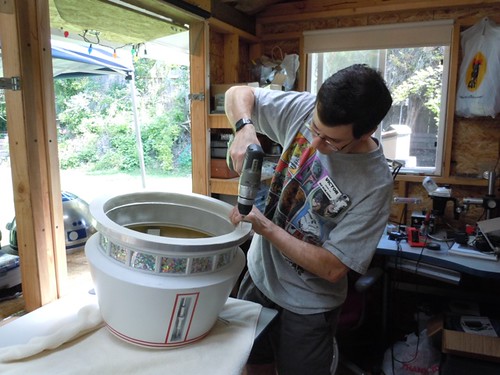


William Miyamoto worked out a way to use Mike's router to trim material from the base ring. In involved drilling three holes in a sheet of 3/4" plywood - one hole for the router bit, and the other two for a couple of segments of 1/2" diameter scrap steel rods that are used as stops. (William and I actually went shopping for a trim router, but Harbor Freight was out of stock on the cheapies, and I didn't feel like spending $140.00 at OSH.)


The stops are inserted like pegs into the 3/4" plywood. To make sure they don't lean or topple over, they are backed by some scrap wood that is clamped down.


Finally, the dome is put down, with the router bit hiding underneath. Initially the router bit is toward the middle of the inside of the dome, but as I slide the dome away from me and up against the posts, the router bit starts routing out material from the base ring as I spin the dome in place. The key is to locate the two steel posts in the proper location. The array of builders films and photographs my potential disaster.
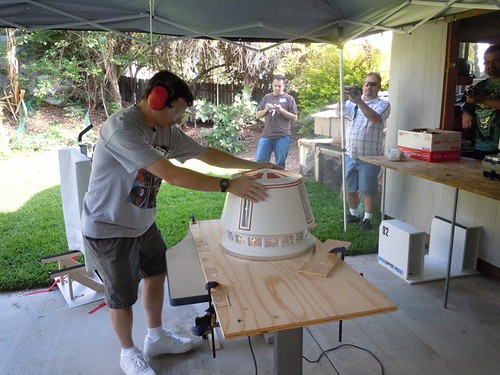


So far, so good on the first pass. The router took out a small amount of material, which is good for the first pass


With a lot more help from William, I made five more passes with the router. We moved one of the steel stops back a little farther for each pass by drilling a new hole location for it, until the circle was routed large enough for the Rockler bearing to fit inside.
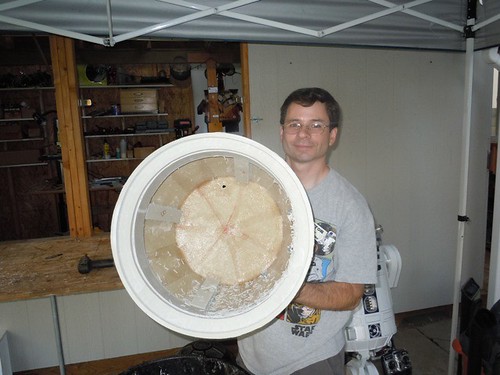


However, I'm not quite done. I need to go back to Mike's again tomorrow and repeat today's steps, with the router bit raised a little higher. This will allow vertical clearance for the Rockler bearing.

It turns out that if we raised the bit high enough for vertical clearance for the Rockler bearing on the first set of passes, bottom of the router bit cleared the bottom of the R5 dome's base, leaving a lip of material at the bottom. So another set of passes needs to be done with the router bit slightly higher, now that the bottom part of the base ring has been routed out. That should go a lot more quickly.

I never did have time to work on the drivetrain. Hopefully I can get to that in the not-too-distant future.

Wednesday, April 18, 2012

CHOC Spring 2012 Visit

Today R2 made his quarterly visit to Childrens Hospital Orange County.


As usual, no pictures from the room-to-room stops with the many patients he visited, but there are plenty with the staff.


The kids always amaze me with their smiles and positive attitudes, they are real troopers!

Sunday, April 08, 2012

Installed Receiver Battery Eliminator

More unanticipated work on droid #1.

For quite a while I've been wanting to eliminate the separate 4.8 volt battery that powers the receiver. I've had the separate battery and on/off switch since my droid was born, and it's a bit of a hassle to have to recharge that battery separately, and always flip two power switches (one for the receiver, the other for all the remaining electronics that run on 12 volts).

This past week I went to Radio Shack and picked up some LM7805 voltage regulators, which can take up to 37 volts and step the voltage down to 5 volts. This 3-pin regulator can handle 1 amp. It's just a matter of hooking the input pin to the 12 volt power supply in my droid, hooking the middle pin to ground, and hooking the 5-volt output to the receiver.

I swung by Mike Senna's house yesterday before his Game Stop gig, as he has filter capacitors that help filter out spikes in voltage that should be soldered to the voltage regulator. Mike added these two small components to the regulator.


A little fire sets the shrink tubing in place.


Today I had time to install everything. The first step was to make sure the regulator was doing its job. 12 volts in, 5 volts (well, 4.97 volts) out.


The regulator works by turning that excess voltage into heat. Thus, I cut a small piece of aluminum bar to use as a heat sink.


I drilled a hole for mounting the regulator, and the whole assembly into the droid.


Let's see... where to put it? Here's a spot on the vertical plank where there is a little room. We'll drill a pilot hole here.


And on it goes.


So far so good, one power switch now turns the whole droid on and off, and I no longer need the receiver battery. Having said that, I'm going to continue to provide the option to use the receiver battery (and backup AA batteries), just in case I need them for some unexpected reason.

Monday, April 02, 2012

Kinect Star Wars Charity Event

Before there was the event, there was the pre-event dinner with Chris Stephens from the Portland area, who was in town with his family on Spring Break. Chris, Mike Senna, Roy Powers and I got together for a bite to eat at Downtown Disney. It's always great to meet up with R2 Builders from out of the area who are in town.


On to the event. I wasn't planning on doing this one, but at the last minute R2 signed up for the Kinect Star Wars launch event at the local Microsoft Store at South Coast Plaza, in Costa Mesa, CA. The event benefitted Make-A-Wish, with a contribution for each character going toward the charity, and an extra donation was arranged on R2's behalf.


This was the object of attention.


Given that it was a worknight/weeknight, I wasn't able to do the preferred schedule of 10:00pm-1:00am. (And I wasn't particularly desiring that shift either.) Instead, I brought R2 out from 8:00pm until about 10:30pm. R2 met the excited staff at the store, and greeted customers.


At 9:00pm, the store temporarily closed, while it was rearranged to host the launch party. R2 interacted with the folks on the outside looking in, and later interacted with them outside the store while they were waiting. (Don't ask me why kids under 10 were out so late, I don't know...)


A professional photographer and a 3-member DJ crew were also on hand. In the meantime, somewhere between 50 and 100 people lined up outside, waiting for the launch party to start. At 10:00pm, the store reopened and the crowd came in to take pictures, play the game, and buy the product.


Since it takes a while to load R2 back into the Droidmobile and get him home, I had to leave around 10:30pm, but the party was still going strong when I left. It seemed like everyone was having a good time.


The full photoset is here.

Saturday, March 31, 2012

Finished Installing Octagon Ports

Today I was able to wrap up work on getting the new aluminum octagon ports installed in droid #1.

I started by marking where I needed to drill holes in the MDF holders that hold the octagon ports in their proper locations.


Then, I took the parts to the drill press to drill holes with a 7/64" drill bit for the wood screws I'm using to attach them.


Then, back to the droid to install them with the wood screw.


The rear octagon port looks good!


The front octagon port looks good too.


And this concludes our unexpected excursion into updating droid #1. What other updates may lie ahead? Stay tuned... (Or not. I don't have much planned.)

Thursday, March 29, 2012

Painted Aluminum Octagon Ports

Today I had time to paint the octagon ports.

After a light sanding with 400 grit sand paper to smooth out the primer, I applied some of the precious Rustoleum Metallic Purple remaining in the can.


So far, so good.


Next up, Duplicolor Anodized Blue, applied about 15 minutes after the purple.


And finally, two clear coats, each applied another 15 minutes after the preceding coat.


About an hour after applying the second clearcoat, I removed the masking tape.


These seem to have turned out well. I'll let them dry a day or two, and then work on getting them installed in the droid.

Wednesday, March 28, 2012

Painted MDF Holders, Primed Octagon Ports

Today I had a few minutes to start spraying stuff onto other stuff related to the octagon ports.

First up, the 1/8" MDF holders. These need to be painted black in order to conceal them inside the droid.


I boldly went without primer, and hit them with a couple of coats of flat black.


Next, I cleaned up the residue that was left over from my work on the octagon port frame pieces, and masked them. They don't have to be masked, but it makes for a neater paint job to not have stray paint all over the outer perimeter.


I then applied three coats of white primer, about 15 minutes apart.


I'll let these dry overnight, and then lightly sand them smooth. Hopefully I'll have time to paint them blue in the near-future.

Tuesday, March 27, 2012

Worked on Fitting Front Octagon Port

When we last left our front octagon port, it was a little bit crooked in its position in the skins.


At first I thought this was because the corners where the screws go on the new octagon ports were running into the frame itself, so I chiseled out some material on the frame, in an effort to make room for them.


There's no need to repaint these areas black, as they are covered by the part itself.


Well, that didn't do the trick. After some more study, I found that the cutout on the inner skins was pretty narrow, as my Dust Buster peeks through the hole.


There's no easy way to widen the cuts on the inside of the inner skin, so I took a closer look at the octagon port. Sure enough, I left a bit of a bump where I had Dremeled off one of the corners the other day. Time to file that smooth.


Okay, now things are fitting much better.


The octagon ports are now ready for primer, and after light sanding, paint. I also need to paint the MDF mount pieces black.