This is motivated by a recurring problem I have with the drivetrain axel milling out an oval shape in the flange that it rotates within. I described this problem here, but it has happened a few times now. After discussing this with Mike and Michael, we decided my flanges should be replaced with bearings.
While I could attempt to retrofit the existing drivetrain bodies to accommodate bearings, on Michael's advice I decided to go ahead and build new drivetrain bodies. Michael has the tools to cut the holes for the bearings (and the bearings themselves), and he was going to be at Mike's house anyway, so we made a build day out of it.
The reason Michael and Mike were together today, is because they were invited to be guests at the R2UK gathering in England, via a video chat. They answered questions and chatted with our U.K. colleagues, and at one point William, Chris and I joined in the merriment.

Afterward, Chris showed us his (repainted) smart phone-operated Dagostini R2 unit, which arrived in the mail one part at a time over the course of two years. It was pretty impressive, it looked good and functioned well.

We grabbed some lunch and then it was time to get down to business. I brought my existing drivetrains to use as a template, along with 26" of raw aluminum tubing for the new drivetrain bodies.

These are the new bearings that will be going in. I need eight of these per droid (four per drivetrain). These are 1 1/8" outer diameter, and 1/2" inner diameter.

I measured and marked where to drill the holes.

Michael and I took turns drilling the initial holes with a 1 1/16" hole saw, just slightly smaller than the diameter of the bearing.


Then, Michael used his reaming tool to widen the diameter to 1 1/8".

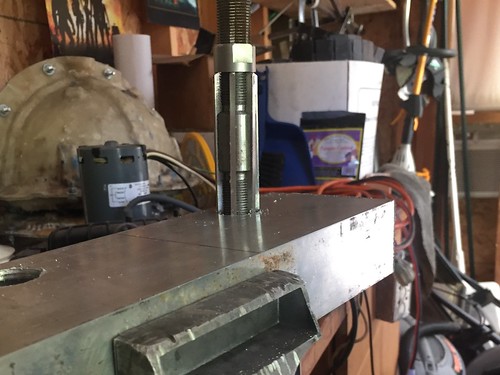
This tool works somewhat like a tap, where you manually twist it from the top. But rather than cut threads like a tap would, this has blades that shave off material from the side walls. You can adjust the width of the hole somewhat, using some nuts that are part of the reamer. The reamer tapers at the top and bottom, and bulges in the middle, which is where the maximum diameter resides.
Once that was done, it was time to cut corners. The top left and right corners of the drivetrain bodies need to be chopped, in order to accommodate the wheels, as seen in the picture of the existing drivetrain above. Mike and I took turns doing that. (One of us had the sense to wear eye and ear protection.)


Lots and lots of corners later, and we were done for the day.

We cut three droids' worth, one for me and two for Mike. We both have two droids, but my droid #2 hardly ever leaves the house, so I'm going to hold off on this modification for droid #2 for the moment.

There is still a decent amount of work left to do, including cutting most of the bottom edge off for the wheels, drilling holes for the motor mount bracket and the channel that rests on top, and building new chain (chain length is highly dependent on exact location of the gears, which is a function of the new holes we cut). Hopefully that won't take forever.


No comments:
Post a Comment