R2 is invited to participate in a Star Wars costume contest tomorrow in celebration of May the 4th, so I thought he could wear some Jedi robes and wield a lightsaber. A friend had a cheapie knock-off lightsaber that was donated for the cause, and another friend agreed to whip up a quick robe for R2.
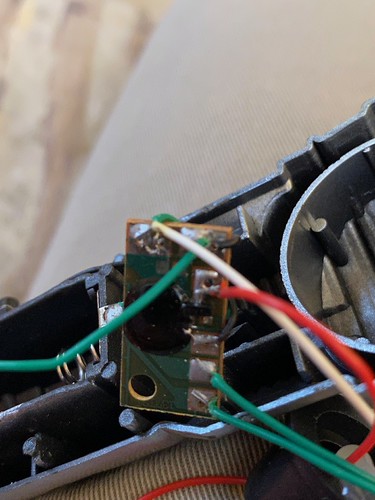
The light saber is operated by pressing down on a button. The light saber is pretty goofy, as it makes laser sounds as if it is a gun, and the LEDs inside blink rapidly. I'm stuck with the red cover, so R2 will be a Sith droid, but I wanted to modify the electronics to not have the laser blasting sounds, and to eliminate the flicker. That part was easy. Just pull out the board, and hard-wire the LEDs to the power when the button is pressed.
Next, I needed to build a holder for the light saber. Fortunately I already have a bit of a rig inside the droid for when he needs to hold the pillow as a ring bearer in wedding ceremonies, (don't laugh, he's done it 3 times already), so I needed to fashion an attachment for the light saber that could use the same rig. The first step was to measure the diameter of the lightsaber.

Next, I went looking for some scrap MDF. I found a partial circle, which I believe is a leftover from the should hub template. I marked it up so I could find the center, in order to use a hole saw to drill out as much material as possible.

I drilled with my hole saw, which removed the bulk of the material.

I used the Dremel drum sander attachment to remove the rest of the material.

I needed to file notches for some of the bumps along the surface of the circumference.


Perfect fit.

I wanted this to fit flush against R2's body, so I needed cut off a chord from the circle.

Admittedly, I didn't leave much material, but the light saber is very light.

I cut a segment of down to glue to the light saber holder.


Once the glue had dried sufficiently, it was time to paint the whole thing metallic.


When the paint had dried at the end of the day, I tried it all out.


I think he's ready for tomorrow.


2 comments:
Thank you for providing this fantastic website. The information and content are highly valuable. Additionally, here are some other intriguing webpages:
https://www.blogger.com/profile/02363464715462734342
https://www.blogger.com/profile/11450248671091109389
https://www.blogger.com/profile/02363464715462734342
Post a Comment